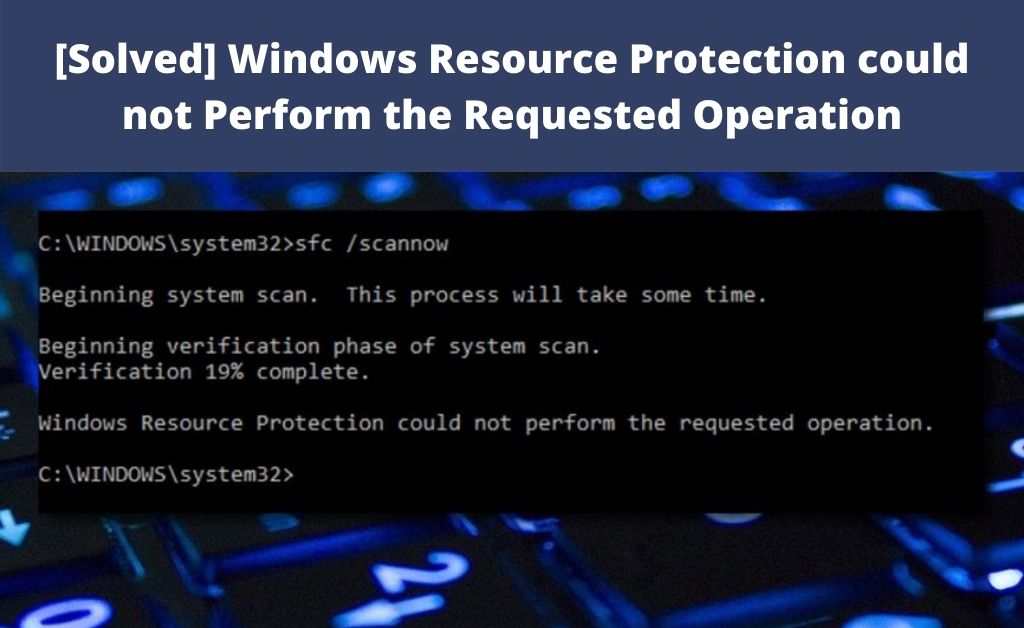
When something is wrong with your system and it freezes, programs fail to run, blue screen and other faults appear, then you might find a message “Windows resource protection could not perform the requested operation”. As per the experts, running an SFC scan will eventually resolve the issue. But sometimes, it might not work out so easily as you have expected.
Thus, you need to know the real causes behind this matter. Some are like — unwanted programs creating a priority clash, Windows server conflicts, SFC Scan now command tool is not responding. Getting rid of this error is mandatory to make the Windows resource work properly.
-
Run the CHKDSK Function
Verifying the disk condition might help you in investigating the entire situation. The built-in system function is generally called CHKDSK scan. With the help of this scan, you can check the health of the disk drive of your computer and make sure whether it is corrupted or not. On the other hand, the Windows resource protection could not perform the requested operation and can also be eliminated.
Open the Command Prompt and type chkdsk C:/r and press Enter key. There will be two options — One is Yes and the other is No. Press Y for Yes to continue to operate. Your computer is all set to start the check disk function when the computer boots up. To initiate the process, reboot your computer. When the check disk function is complete, hopefully, the error will not appear.
-
The SFC Scan in Safe Mode
If somehow the previous step failed to rectify Windows resource protection and could not perform the requested operation, the SFC scan in Safe Mode will surely help. Before performing the SFC scan, you need to – move to the search bar and type ‘msconfig’ to open the configuration window. Now, access the Boot tab and check the Safe boot checkbox.
Be sure that the Minimal check box is already tick marked. Now, click on OK and then Apply to save changes. Reboot your computer to enter the Safe Mode. Run the SFC scan and hopefully, the error will be automatically eliminated.
-
Modifications in the Security Descriptors
The security descriptors are those types of files that belong to the Windows system, as well as the update files. They are generally stored in the WinSXS folder. When the SFC scan tool is unable to access the folder, you might get an error message. Therefore, certain modifications are necessary to eliminate the Windows resource protection could not perform the requested operation situation.
As usual, the Command Prompt will help you to do that. Run the Command Prompt as the administrator. When the application opens, type ICACLS, then C:\Windows\winsxs and press Enter. Now, close the Command Prompt and restart the computer so that the changes can become effective. Once again, run the SFC scan and try to solve the problem.
-
Activating the Modular Installer
The SFC scan will not work if the Windows modular installer is not activated in the system. Therefore, its activation is very much necessary. The modular installer plays a vital role in downloading and installing the Windows Update files. To enable the Modular Installer to open the Windows service and find the Modular installer option. As usual, it is disabled, click on Enable to start the function, once again.
-
The Recovery Commands
If some of the system files are corrupted for obvious reasons, then the Windows modular installer is not activated in the system. That is why there are some recovery commands that might help you in repairing the broken or damaged files. Open the computer in recovery mode and start Command Prompt.
When the application opens, write sfc/SCANNOW /OFFBOOTDIR=c:\/OFFWINDIR=c:\windows, press Enter. When this command is being executed by the computer, turn off the recovery mode and roll back the system to its original mode.
Other Troubleshooting Processes
Clearing the cache or the junk files from the temporary folder is one of the easiest ways to eliminate Windows modular installer is not activated in the system. Deleting all the files will definitely do the job for you. On the other hand, if none of the processes works to resolve Windows resource protection could not perform the requested operation, the last and final troubleshooting procedure is to format the computer.
In order to do so, you need a storage device first. After that, download an application that has the ability to create a bootable storage device. After that, download the desired OS image file that you use. With the help of the on-screen instructions, burn the image file to the removable storage device.
Most of the experts suggest that a pen drive or a data-traveler drive will be much more convenient than a compact disc. The installation will be faster and reliable. After the bootable storage device creation is over, reboot your system and insert the drive. Windows will load its necessary files for some time.
After that, read the instructions very carefully and proceed. When the system drive appears, select that particular drive where the previous OS is being installed. Now, click on format and all the files in it will be deleted. Finally, click on Next to start the OS installation.
When the installation is complete, install all the necessary drivers like display, sound, graphics, trackpad and others. Hopefully, the error will not appear as the new OS is being freshly installed.